Showing posts with label seafood. Show all posts

Saturday, July 16, 2016

Sake Marinated Tuna with Sesame Crust and Peppercorn "Yum Yum" Sauce


Well, I'm back.  I haven't been cooking much that's exciting lately but as it's a Friday night I felt like being creative.  

I love seared tuna.  This recipe is simple yet elegant enough to serve at a dinner party.  Just double or triple the recipe as needed.

I like to serve this with a little Napa cabbage braise/sauté and Forbidden Rice.   It makes for a beautiful plate and a delicious dinner for two.   

The Peppercorn "Yum-Yum" sauce takes a little help from the store.  It's okay to cheat now and again, both with your diet and your cooking shortcuts.  Hey, everyone is super busy, right?

Oh, and I like to plate this with a little bottled ginger sauce.  Not only do you get both flavors of the ginger and the Yum Yum sauce like you do in the restaurants, but it looks pretty on the plate. 

BTW - try adding a little soft honey butter to your rice and water when cooking your Forbidden rice.  You'll be glad that you did. 

Enough chit chat.  Here you go!


Ingredients:

1/4 cup dry sake, divided
2 teaspoons light soy sauce, divided
1 teaspoon bottled minced ginger
1/2 teaspoon garlic paste (fresh garlic, chopped and smashed into a paste)
2 center cut tuna - about 5 1/4 ounces each - cut about 2 inches thick
1 ounce Sesame seeds                                  
1 teaspoon mixed peppercorns, crushed
1/4 cup green onions/scallions sliced, for garnish


Canola oil for coating skillet
Bottled ginger sauce for plating (optional)


Directions:

Pat tuna dry.

Combine 1/4 cup of the sake, the soy sauce, ginger and garlic in a non-reactive container.  Whisk to combine.

Add the tuna steaks, cover, and shake to coat.  Refrigerate until ready to prepare; marinate for at least 30 minutes. 

Remove tuna from marinade and pat dry. 

Place sesame seeds into a pie pan.   Coat all sides of each tuna cut, pressing the seeds into the flesh of the fish.

Coat heavy skillet, preferably cast iron, with canola oil.  Heat to smoking hot.

Sear tuna on both sides, about two minutes each main side and thirty seconds on ends for a rare center, three minutes each main side for medium rare.  

Let rest for a few minutes before slicing.

Mix peppercorns into the bottled Yum Yum sauce. 


Want a zippier sauce?  Add more peppercorns!

Enjoy and I'll see you soon.

Monday, December 21, 2015

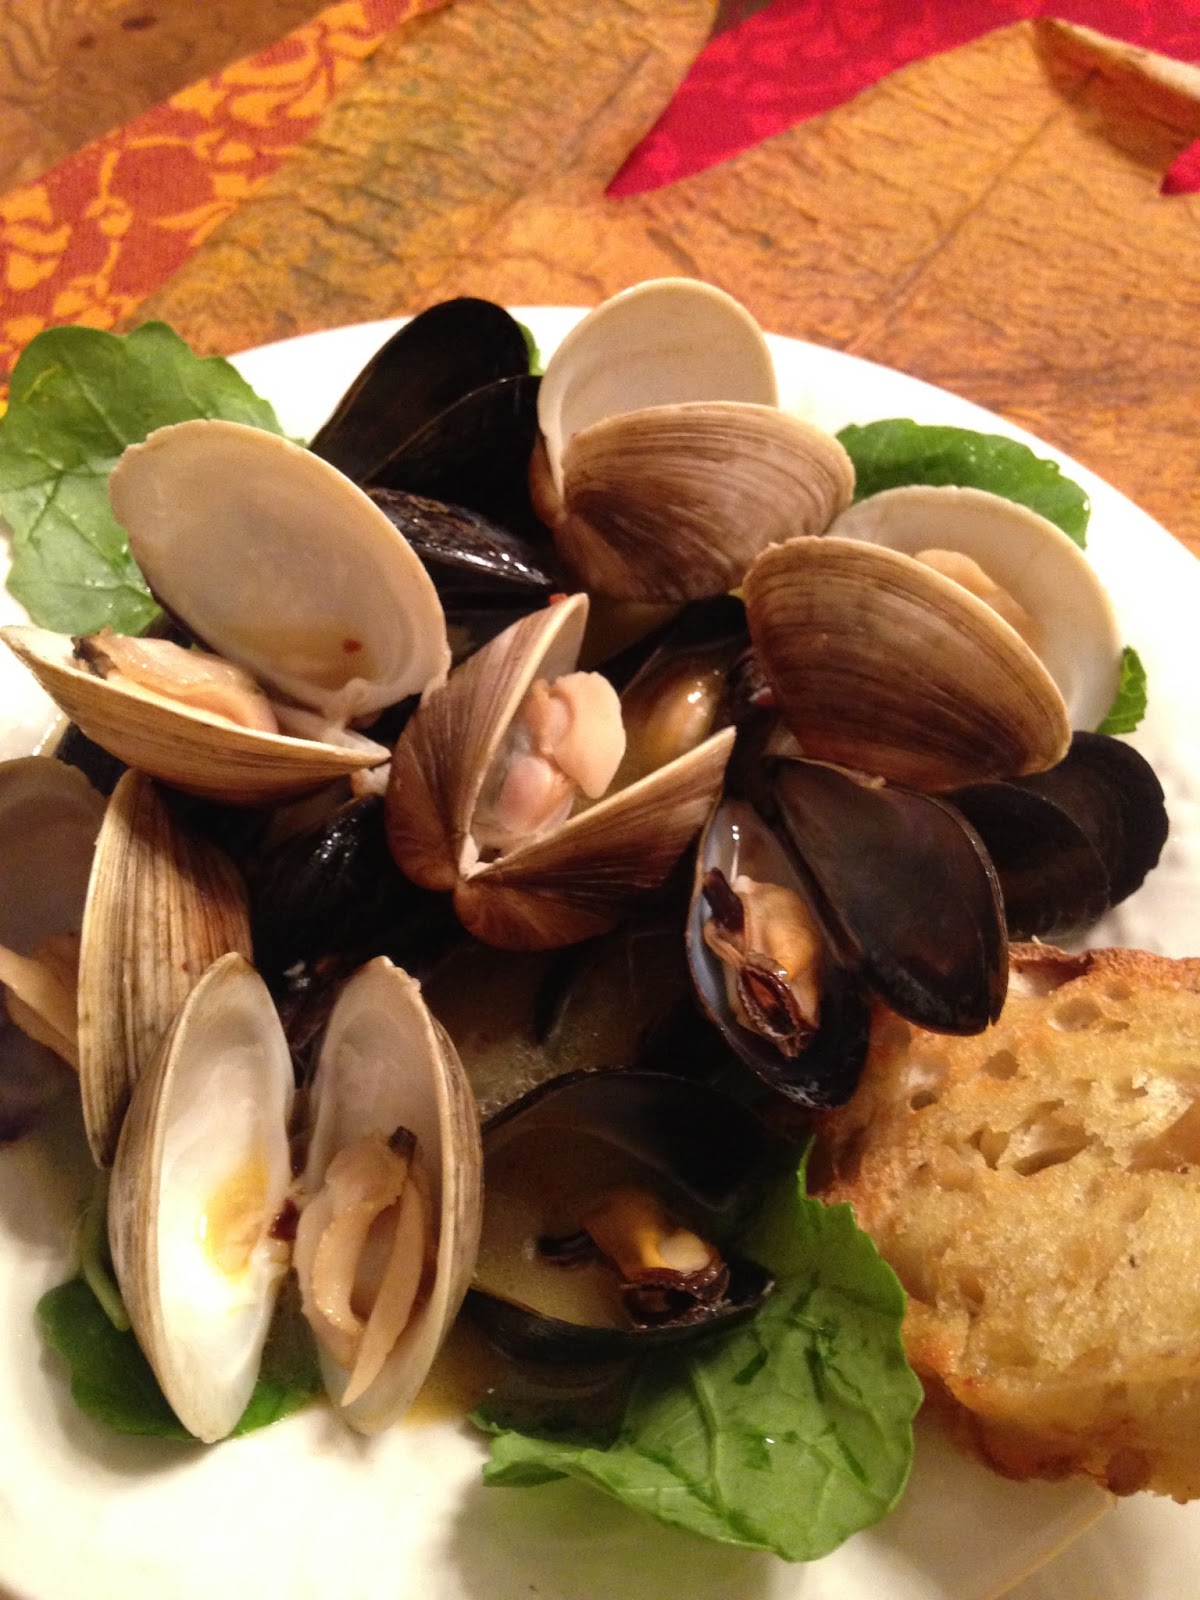
Clams and Mussels in a Savory Broth over Baby Kale Blend


Clams and Mussels in a Savory Broth over Baby Kale Blend

Happy Holidays, everyone!

I know I haven't been posting as many recipes.  Truth is, I got my creative writing "Muse" back;  I'd been suffering from a terrible case of writers block the last couple of years.  In my spare time (after my full time job) I've been writing a screenplay again.  So, I honestly haven't been cooking as much.  I bring no recipe to you unless it's been fully tested.

Here is one of my favorites.  It's perfect for holiday entertaining.  Particularly on those nights when your holiday company is arriving and you need something fast so you can finish the shopping, or attend a holiday event. It's also great in small portions served as an appetizer for a holiday meal.

Clams and Mussels in a Savory Broth over Baby Kale Blend -

Sounds fancy, huh?   This time of year, I like a few of these “go to” appetizers for entertaining.  But this also makes a nice treat if you’re cooking for two.  Here is the recipe for 2, but you can double or triple this if you are having a party.

Try to find the Meyer lemon if you can.  It really makes a difference in this dish!

Ingredients:

1 dozen cherrystone clams
1/2 lb. mussels
1/4 cup corn meal
2 1/2 tablespoons butter
1 teaspoon olive oil and canola blend
1/2 teaspoon crushed red pepper
1/3 cup extra dry vermouth or non alcoholic dry white wine
1/4 cup Meyer Lemon juice
1/2 teaspoon Tamari
1 teaspoon mashed garlic (about one large clove)
2 cups baby kale blend salad

Directions:

Soak the clams and the mussels in water with the corn meal under refrigeration for about 1/2 hour.   Strain and rinse. 

Add the butter and oil to the pan along with the crushed red pepper.   Once the butter melts, let the pepper infuse for about a minute, but be careful not to brown the butter.


Add the clams and the mussels to the pan along with the vermouth, lemon juice, Tamari and garlic.

Cover and simmer over medium heat until all clams and mussels open, about 10 minutes.  Discard any unopened shell fish. 


I hoped you've enjoyed the recipes that you posted this year.  And from my family to yours, wishing you a joyous Christmas and a happy 2016!

See you next year.

MK


Friday, October 2, 2015

Shrimp with Mushrooms and Tomatoes


Shrimp with Mushrooms and Tomatoes
Served over Yellow Rice with Garlic and Parmesan Asparagus
 
I'd like to thank my friend Sherry Miller, again, for submitting a recipe to me last week.  I got a lot of great feedback on it.
Keeping with the mushroom theme, I made this delicious shrimp with mushrooms and tomatoes this week.  It's super easy for a busy weeknight. 

I like to serve this with packaged yellow rice and roasted Parmesan-garlic asparagus.  Yum!
What I love about this dish is that it’s a nice summer-to-fall transition meal.  If the weather is still a bit on the warm side, it’s not too heavy.  But the mushrooms and the butter gives this dish a nice “comfort food” quality.   And it’s easy to prepare.  It’s perfect for one those busy nights when you’re running to this practice and that practice.  This just might be one of your new “go to” meals if you enjoy shrimp.

I use Campari tomatoes in this recipe.  If you are not familiar with them, they are bigger than cherry tomatoes but smaller than a vine tomato.   You can easily find them in the produce section.  If you can't find them I would use the smallest vine ripened tomato you can find but you may need to seed them.  Campari tomatoes have seeds but they are not as prevalent as they are in a tomato that you would use on a sandwich or in a salad.
And using butter in moderation is just fine.  That's why I often use butter to finish or thicken sauces. 
Don't want to use wine or non alcoholic wine?  Don't use cooking wine or broth.  It will change the flavor of this recipe.  I'd rather you add just a little bit of water mixed with a little extra lemon juice.  
So here we go:

Ingredients:                                                                                                                                    

Serves 2

1 tablespoon olive oil
1 medium shallot, sliced thin (about 1 1/2 tablespoons)
2/3 cup sliced Baby Bella mushrooms
5 sprigs thyme, stripped
14 extra large shrimp, peeled and deveined
1/2 teaspoon seafood seasoning
1/4 cup dry white wine or non alcoholic wine
1/4 cup fresh lemon juice
1 tablespoon butter, divided
8 Campari tomatoes, quartered
Parsley for garnish

Directions:

Add olive oil to sauté pan along with the shallots.  Cook for about three minutes until shallots soften.  Do not brown. 


Add the mushrooms and sauté until golden; about four or five minutes.   While mushrooms are sautéing, add the thyme.


Toss shrimp in seafood seasoning.  Add to skillet and cook until shrimp begin to turn pink; about three minutes.
Add the wine, the lemon juice and half of the butter.  Lower the heat to a low simmer and let sauce reduce to about half – about three more minutes. 

Remove from heat.  Add the rest of the butter and the tomatoes.  Let the tomatoes sit in the hot sauce for about two minutes. 
 
 
Top with parsley and serve immediately over yellow rice. 
Enjoy and I’ll see you soon!


Thursday, April 3, 2014

Special Feature: The Food of Chile

Before I begin this post, my thoughts and prayers go out to the people of Chile of the recent earthquake.  We were not anywhere near the area where we had the earthquake, but my thoughts go out to family members of those we met in Santiago who live in that region of the country.

****************

                                          Seafood Salad at La Perla, Santiago, Chile

My husband, Dan, and I both compete in the amateur cooking contests, as you know.  As a prize for one of the contests Dan won, we were both guests of Santa Rita winery for his prize in the "Kick it Up a Nacho" contest.  Interestingly, he was a last minute entry.  We just got back this week.  What a great trip.

This post isn't going to be a travel-log.   I am not endorsing any of the establishments here.   I wanted to share some of my favorite that I had in Chile, so that you can get an idea as to what type of food to expect if you travel there.

Tonight's post will be a little different as I am not providing recipes as these are not my dishes.  But I wanted to show you the types of food that ate while there.  I will give you an idea of how these were prepared. 

I was amazed at how many American chains are in Santiago.  From fast food to Chinese, you can find it all.  But who wants to eat someplace where you can eat at home?

Let me start with my favorite meal.  As guests of the Casa Real at Santa Rita, we were treated to breakfast each day, and one lunch and two dinners at the hotel.  By far my favorite was this almond crusted salmon that we had for lunch.  Deliciously seasoned and perfectly. It was served with peeled, boiled potatoes and asparagus sautéed with translucent onion.  The almond crust was superb. 

I am going to try to recreate this dish.  I'll be posting my version very soon!


The salmon was served with a starter of pumpkin soup.  The pumpkin was pureed with other vegetables to create this delicious appetizer.  The soup was quite savory. 


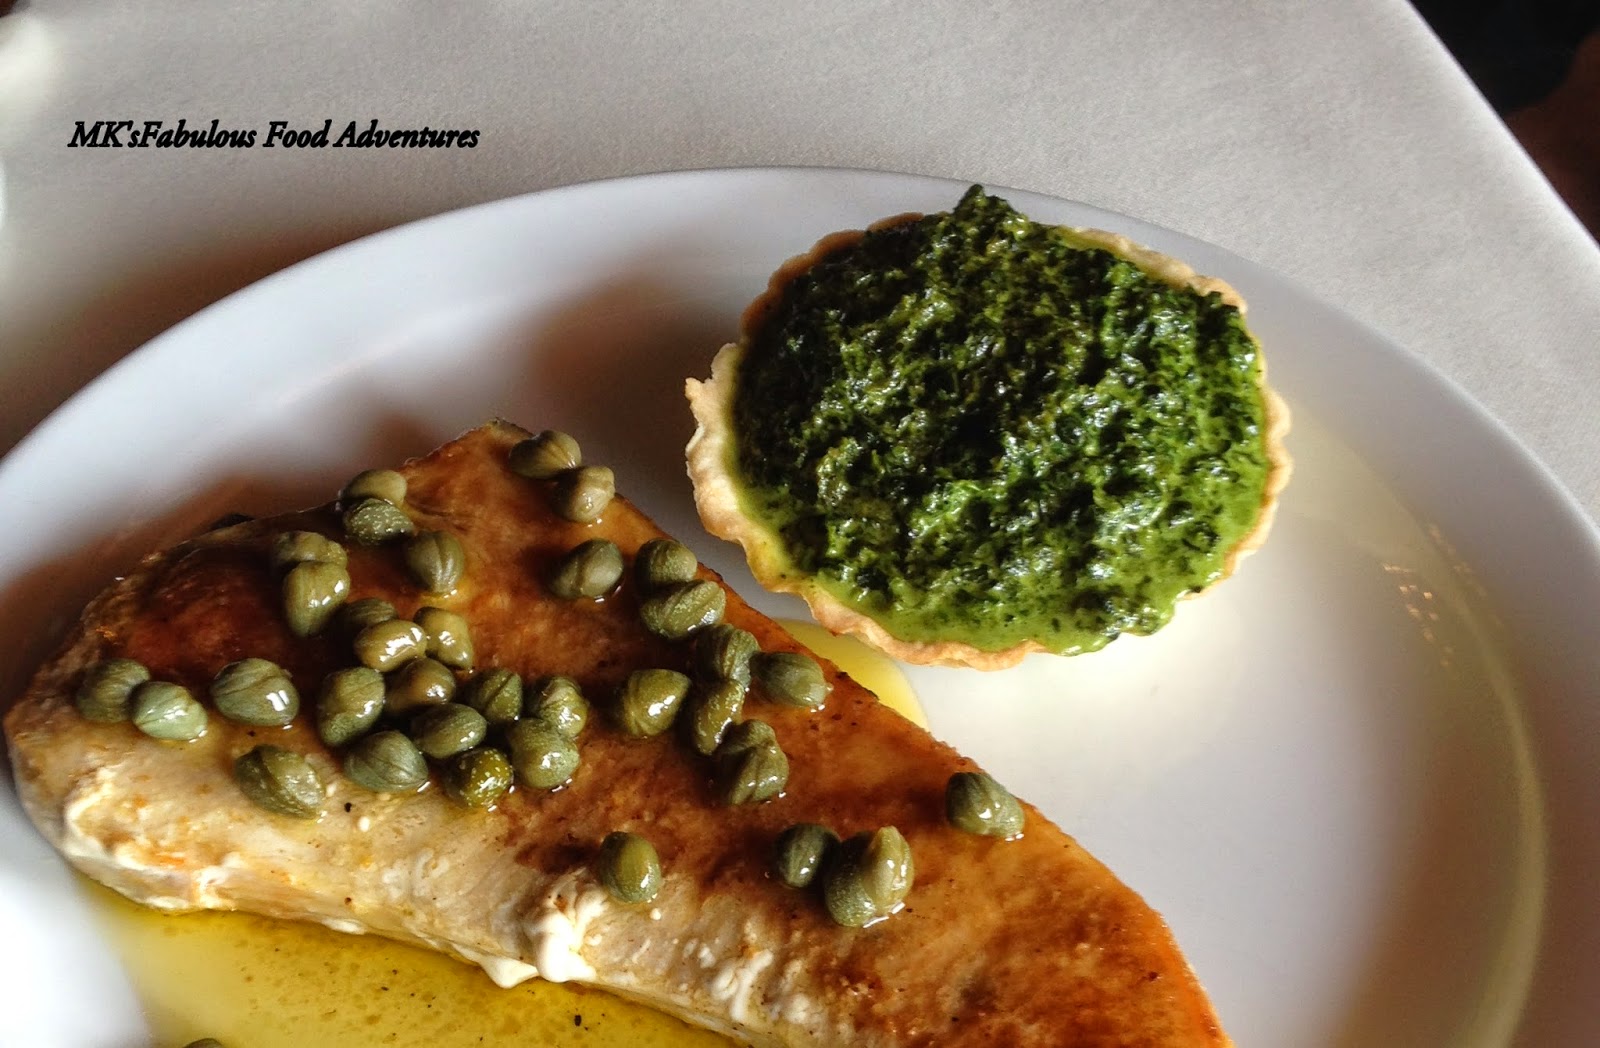
My second favorite meal on property was at the Dona Paula restaurant on the Santa Rita winery grounds, just a short walk from Casa Real.  The Dona Paula is a national monument, and is said to have housed the 120 soldiers who helped win Chile's independence.    It was a delicious swordfish with the best lemon caper butter sauce I had ever eaten.  It was served with creamed spinach pie.


At the same meal, Dan had the mushroom sauced sirloin with fries.


We also had our last night at Casa Real.  It was sirloin with sautéed mushroom and onions and accordion potatoes.  The starter for this meal with a delicious warm shrimp and zucchini salad with a lime and cilantro vinaigrette

.  

The meals at the Santiago portion of our trip were not included (except for the daily buffet breakfast offered by the hotel).  We found a wonderful local seafood restaurant at the mall called La Perla.  The seafood salad you see at the top of this page -- we liked it so much that we ate it for lunch on both Saturday and Sunday.  It was big enough to split.  We also split a plate of crab empanadas (it comes in four pieces) on Saturday.  On Sunday we tried the beef empanadas instead.  I have to say, they were good, but I preferred the crab, especially with a drizzle of the lemon oil that they bring to your table.   The sauces you see in the picture below are served with bread.  I rather enjoyed the artichoke and cilantro sauce with crusty bread.  Yum!


There were more food experiences, such as a delicious Chilean Sea bass we were served for dinner the first night at Casa Real.  I will also be posting a great Trip Advisor review about a great wine and tapas bar we found in Santiago.  The wine bar was on our own dime, and unfortunately, we dug into the tapas before thinking about taking pictures. I did get pictures of the establishment.

Finally, you're probably wondering what you get for dessert?  We had a couple of great custard dishes (with chocolate), but I found this was the most interesting.  It was type of gelatin with blueberries with a cream sauce on the side. 


As you can see, the food in Chile, while perhaps not as adventuresome as Peruvian cuisine, is heavy on seafood and beef.  At the restaurants, you can also find more traditional dishes such as seafood casserole and seafood soup.   Jellies, jams and sauces are served with freshly baked bread.  This is a sampling of what we had. 

I hope you enjoyed this culinary journey, and I'll see you soon!

Thursday, December 5, 2013

Tuna Scampi-Style with Baby Spinach


I am constantly trying to improve this blog and your experience.  I am still learning and I hope you enjoy the changes that I am making.  I am going to be trying different things with the photographs to mix it up a little. 

And I am also constantly improving my recipes.  This is very similar to one that I did a while back, only better.  It's delicious Italian tuna done Scampi style.   I know, scampi is a large shrimp.  But this recipe is in the style of shrimp scampi.  And it's a one-dish meal (I love those on a buys weeknight). There is baby spinach in there.

Anyway, you are going to love it!

Oh, and before I forget, I have a new Facebook page which actually matches the name of my blog.  https://www.facebook.com/mksfabfood  I hope you will join me there. 

Serves 2

Ingredients: 

1/4 lb. whole grain spaghetti, prepared per package directions
2 tbs. olive oil and canola oil blend
1 tsp. anchovy paste
1/2 tsp. crushed red pepper (plus more for passing at the table)
1 small shallot, chopped (about 1 1/2 tbs.)
2 tbs. butter, divided
2 tbs. lemon juice, divided
1 can (5 ounces) good quality Italian tuna packed in oil
Splash of dry vermouth (optional)
4 ounces baby spinach
1/4 tsp. ground nutmeg

Directions:

While the pasta is cooking, add the oil, anchovy paste, crushed red pepper and shallot to a deep skillet.  Sauté for about three minutes until the anchovy paste melts and the shallot softens.

Turn heat to low.  Add half of the butter.  Once the butter melts, add the lemon juice and the tuna and the oil from the can.

Break the tuna up (carefully) with the back of a spoon.  Add the vermouth (if using) and warm through.

Add the spinach and the nutmeg to the pan.  Wilt the spinach.

It's ready to serve!

I hope you will enjoy this recipe and as always, I'll see you soon!  ;.)


Wednesday, October 30, 2013

Lucky 13 Recipe II: Dan My Man's Lighter Fish Nuggets and Fried Pickles - And a Confession


Every once in  a while this home cook's recipes don't work.  But I don't feel so bad when I see Bobby Flay's test kitchen helpers tell him that he needs to work on something during an episode of one of my favorite shows, "Thowdown." 

Today, I'd like to confess to you that I tried something new, and I failed.  But hey, life is all about taking risks, right?   Can't play it safe; not even in the kitchen. 

Such was the case with the lamb shank I cooked for our 13th anniversary.  Don't get me wrong;  it was flavorful.  The "lemon broth" I made to go over the lamb and the veggies gave this dish a hearty deconstructed "stew-like" quality. 

But I'd never tried to roast lamb shank before.  I had only braised it.  Had I taken the time to do a Google search or gone here Food Network Cooking Guide for Lamb, I would have quickly learned that the butcher's instructions given when I purchased the shank weren't going to work as I thought they would.  I guess you can roast lamb shank, but it takes some special way of doing it which I haven't mastered yet.


                                         My failed attempt at a Deconstructed Lamb Stew
                                                  Tasty, but it wasn't quite there...


I made a promise to you all when I started this blog that I wouldn't post any recipes that didn't work.  My photos might not always turn our perfectly because I am not a great photographer.  I am still learning the art of plating.   That's what makes this blog my "adventure."  But I want the recipes that I post for you to work when you try to recreate them. 

I hope you will say, "Mary Kay, I appreciate your candor and you not wanting me to waste my time making something that won't turn out that good.  Oh, and by the way, you are looking pretty foxy these days.  I can tell that power yoga you are doing is really working."

...Maybe the later is wishful thinking on my part.  :.)

Okay, let's get serious! 

I always know that Dan's fried fish recipes turn out wonderfully.  He is my loving husband and my "fry daddy."  As promised, I am bringing you his creation tonight.

We don't fry food very often, for obvious health reasons.  When we do, we've learned to make it a little lighter.  Like any indulgence, this is a once every few month deal - nothing to be put into your regular meal rotation.  Let's face it; it's hard to make anything fried truly "healthy."

It was only a few years ago when Dan and I really started "cooking."  Up until then, we opened a lot of boxes.  Neither of us has had any formal culinary training - we both watch a lot of Food Network!   And now look at us - winning cooking contests - getting recipes published.  

Cooking is something that we love doing together.  When I am developing a recipe, he will help me gather ingredients and vice versa.  The couple who cooks together, stays together. 

Over the years, Dan's prepared other cook's "fried" fish recipes and they've turned out great.  And he's often used boxed beer batter to make the process either.  But now he's come up with his own beer batter recipe that is light and fluffy and frankly, it's going to knock your socks off.

So here we go:

Ingredients: 

60 ounces canola or vegetable oil
1 lb. white fish, such as snapper, sole or flounder
1/2 cup hamburger dill chips
2 cups all purpose flour
3/4 tsp. pepper
1 tsp. salt, plus a little extra for seasoning
1/2 tsp. dried dill weed
1 large clove garlic, minced (about 1 tbs.)
1 tbs. paprika
1 tbs. seafood seasoning
1 tsp. onion powder
1 extra large egg
8-10 ounces light beer


Other: 

A couple of unpeeled garlic cloves (optional)
Basil and parsley (optional)

Directions:

Preheat oil to 360 degrees.  Dan recommends that you use a candy thermometer. 
If using the unpeeled garlic and herbs (recommended), these are added to the oil while it is preheated.  Remove herbs before adding the fish and discard.  This step will "infuse" the oil with wonderful flavor. 


In a large mixing bowl, add the flour, salt, pepper, dill weed, minced garlic, paprika, seafood seasoning, and onion powder.  Add egg.  Using a fork, blend the egg with the dry ingredients until mixed well.  You will start to see "pearls" form from the wet flour. 

Add in the beer and whisk well until completely blended. 

Cut fish into nuggets or bite-sized pieces.  Season with a little salt.  This helps to "dry" the fish slightly and makes the batter stick.

Dip fish into batter and CAREFULLY drop into hot oil.  Cook for about a total of three minutes.  Do not over crowed the pan - cook in batches.   Transfer to a plate lined with a paper towel.  Salt the batches of fish lightly as they come out of the oil. 

Repeat the batter and frying process with the pickles, but do not salt the pickles before or after cooking as they are salty.  The pickles may only take about 2 minutes.  Adjust cooking time accordingly.


Serve immediately.

See you soon!  Oh, I am working on an un-stuffed cabbage recipe tonight. If that works, I might bring that to you later this week instead. 

Cheers!

Tuesday, October 15, 2013

Wasabi-Lemon marinated Grouper topped with Creamy Red Potato Mash and Herbed Tomatoes & Mushrooms


It's been a busy time.  I'm still working on an e-learning project - and I'm patiently waiting to hear back on notification for a few more online cooking contests. 

This weekend we will be attending the Oktoberfest celebration once again.  I'll be posting pictures of that and a new October recipe very soon.  

I love October... not only because its my birthday month (I'm 51 next week), but it's the month that I married the love of my life, Dan.   

You can check out previous "October" pictures on this blog. 

It's Grouper season here in Florida.  Here is a five-star restaurant-style recipe that won't break the bank.  Let me rephrase that -  This is a bit of a late 80's - early 90's five star throwback recipe.  It's similar to something I recall eating when I was in the 18-25 range, with the exception of one "kicked up" ingredient; wasabi!

Yes, it's grouper marinated in white wine, wasabi and lemon, and then masterfully baked and then broiled with creamy fresh red potato on top.  (I love this trick because it's a way to feel like you're eating potato without feeling guilty). 

I've also have a fantastic "double" topper made from dry white wine, fresh mushrooms, grape tomato, lemon juice, Worcestershire sauce, a little finishing butter and a pop of fresh herbs. 

This dish takes a little time and TLC to prepare, but it's worth it.  All you need is fresh roasted asparagus on the side. 

Note:  I recommend getting out the good olive oil -- the kind you use to dip your bread -- when you make the herbed tomato and mushrooms.  However, if you only want to use one kind (the light), you certainly can. 

I like to select grouper that is filleted about 1/2 inch thick, and one that will fit nicely into my 9 X7 oval casserole dish for a perfect presentation out of the oven (for a nice family-style meal).  However, you can bake this in any dish you like. 

Lemon and garlic finishing butter can be found near your fresh seafood case.  If you cannot find it, you can substitute regular butter, a 1/4 tsp. chopped garlic and add in more lemon juice to taste.

So here you go!

Ingredients:

Serves 2-3

1/2 - 3/4 lb. fresh grouper fillet
1 cup 2% milk (optional)

For the Wasabi-Lemon Marinade:

3/4 cup dry white wine*
1/2 tbs. fresh lemon juice
1/2 tsp. wasabi paste (or to taste)

Grouper seasoning: 

1/2 tsp. seafood seasoning

For the Creamy Red Tomato Mash:

1 large red potato, cut into eight pieces
1 tbs. butter
1/2 tsp. dried dill weed
1 tbs. low sodium chicken broth (or water)
1/2 tbs. light olive oil, plus a drizzle
Pinch or two Seasoned salt, to taste

For the Herbed Tomato and Mushrooms:

1 tbs. good quality olive oil, divided
10 pieces steakhouse-style sliced white mushrooms
1 tbs. softened lemon and garlic finishing butter, divided
grape tomatoes, halved (about 1/2 cup)
1/2 tsp. Worcestershire sauce
Squirt or two fresh lemon juice*
1 tbs. dry white wine*
Assorted fresh herbs (parsley and basil work nicely)

Other: 
Cooking spray
Paprika (optional)
Fresh lemon slices (optional)

*repeated ingredients


Directions:

About 2 hours before cooking, marinate grouper in 2% milk.  Cover and refrigerate.  This step is optional.

30 minutes before preparation:  Pat fish dry with paper towel if marinating in the milk.  Add wine and lemon juice to a bowl and whisk in the wasabi paste.  Add the fish.  Cover and refrigerate for another 30 minutes and then;

Preheat oven to 350 degrees. 

Remove grouper from marinade.  Pat dry with paper towel.  Season on both sides with seafood seasoning. 

While the oven is preheating and the fish is taking the refrigerator chill off, add potato, butter, dill weed and chicken broth to a microwave safe bowl.  Cover with plastic wrap and microwave on high (about seven minutes) until the potato is soft.  Add the olive oil (minus the drizzle) and the seasoned salt.  Mash potatoes.  Let cool.

Note:  I like to put them into the freezer to cool for a few minutes while I prep my side dishes.

Add grouper to a casserole dish coated with cooking spray.  Top grouper with cooled potatoes and a drizzle of olive oil.  Bake for 20 minutes, uncovered.

After 20 minutes, turn on the broiler.  Continue to broil for about ten minutes, until the top of the potatoes is browned to your liking.  Adjust cooking time accordingly for your oven and broiler.


While the fish is under the broiler, add half of the olive oil, the mushrooms and half of the finishing butter to a sauté skillet.  Sauté until browned, about five minutes, turning as needed.   

Add the grape tomatoes, Worcestershire sauce, lemon juice and white wine.  Add remaining olive oil and the finishing butter.  Simmer lightly until combined.  Add in the fresh chopped herbs.


Top the fish with paprika and lemon slices before serving. 


Note:  Wine can be omitted;  replace with low sodium chicken broth. 

Pair with a nice white Bordeaux (sauvignon blanc/Semillon blend).


Friday, July 19, 2013

THE Perfect Oven Roasted Salmon -- With "Fancy" Butter

Wild Salmon roasting in the oven.  Yum!


I was going to grill tonight.  The mosquitoes kept me away.  I guess I must be really sweet, because those bugs sure do like me.

But I have to admit; it's MUCH cooler down here in Florida than it is up north right now.  Amazing.  Being that I am not your local weather forecaster, I must be here for another reason? 

Yup.  FOOD!  I will get on with the show.

Salmon is a great food when you are trying to eat healthy.  Hubby and I both struggle with our weight.  I try to keep mine in check by jumping around the room like a maniac to my exercise DVDs - and shouting out a few choice words at the trainers, too.  Hey, they can't hear me. 

Or can they?

Cue the Twilight Zone music.

Up until I crossed the 40 yard line, as I like to call it, I never used to have to exercise, btw! But then, back in the day, I never wrote things like btw either.  So there you go!

Dan (hubby) does not care for salmon all that much, unless it's been cooked until it flakes.   Well done salmon can taste dry to those who love it.  So I came up with this easy weeknight meal that stays true to the fish, while catering to all sorts of tastes. 

Read on and you will see what I mean.

Serves 3-4.

3/4 - 1 lb. wild caught Sockeye Salmon, skin on
1 tbs. Extra Virgin Olive Oil (good quality)
1/2 tsp. Canadian Chicken Seasoning (I used Weber brand)
1/2 tsp. seafood seasoning (I used Old Bay)
1 tsp. dried dill weed
3 slices fresh lemon
1 tbs. lemon juice
1 tsp. capers, drained and rinsed


For the "Fancy" Butter:

2 1/2 tbs. butter
1/4 tsp. anchovy paste
1/2 tsp. chopped fennel fronds

Other:  Butter flavored cooking spray

Directions:

Preheat oven to 375 degrees F.  


Place salmon , skin side down, on a tin foil-lined baking sheet.  Rub the salmon with the olive oil.  Sprinkle the chicken seasoning, the seafood seasoning and the dill weed on top.  Rub into the flesh of the fish.  Top with lemon slices.

Bake fish for 18 minutes for opaque, 23 minutes for well done.  Note: During the last three minutes of baking, top the fish the lemon juice and caper mixture.

Combine softened butter with anchovy paste and fennel fronds.  You can either leave it whole and slice it on top of the cooked fish, or you can smash it all together. If you decide to go with leaving it whole, I recommend you keep it in the refrigerator until you are ready to serve. Either way, you top the fish before you are ready to serve it.

I like to serve this dish with pasta tossed with olive oil and fennel roasted with red pepper and lemon juice.  It's a good way to use up some of my dried peppers that I am growing.  Check this out!


Enjoy.  Oh, and I promised you when I re-started this blog that I would be doing more special features and videos.  I'm going to attempt another video within the next couple of weeks.  We will see how that goes. 

Cheers and peace!

As usual, no product was supplied to blogger.  Names of products provided as substituting could change the taste of the dish.

Looking for a wine to pair with this dish?  Try a crisp Pinot Grigio.

Sunday, July 7, 2013

East Texas Six Pepper Jambalaya


My East Texas Six Pepper Jambalaya

If you’ve ever travelled through East Texas on the way to Louisiana, there is such an array of culinary delights, from Tex-Mex to Barbecue to Cajun cuisine.  Back in the mid-to-late nineties, I installed practice management systems for a living.  Florida, Georgia and Texas were my territory. 

I am not shy when I travel alone about taking myself out to dinner.  I take a good book, or some work, and bury myself in that while I get to enjoy a nice, relaxing meal after a long work day.   My tip to you if you travel on business;  Skip the room service.  It’s over-priced.  Go ask your concierge for a nice, local place where you don’t have to drive too far.  Often they will recommend a place within walking distance if you want to have a cocktail or two.  It’s a great way to experience the culinary treasures that reside in the various regions of this great county. 

AND...  you meet great people.

Back to my recipe:


I grow my own peppers on my patio garden each summer.  This recipe gave me an excuse to use them, as well as a little of this and a little of that I had in the refrigerator. 

My husband, Dan, makes the best traditional Jambalaya recipe I’ve ever tasted.  This is a close second.  I used his cooking technique for the perfect rice.  You will note I used the natural flavors of the peppers and very little added salt in this dish. 

The heat level on this is just nice; it’s hot enough to make you crave another beer or glass of sweet tea, but not so hot that you couldn’t add a little more hot sauce if you like it really spicy. 

Dan loves this dish.  He thinks the combination of the chicken, shrimp and smoked sausage give it a lot of “substance.”  You won’t go hungry. 

The list of ingredients looks long but I promise you, this isn’t complicated at all. Most of these things you probably already have around the house or could purchase on your next trip to the farmer’s market or grocery store. 

I used my late mom's favorite stew pot for this recipe.  It's very well... seasoned.  It's likely as old as I am.  I am sure they don't make these pots anymore for obvious reasons.   Hey, I've been eating out of it for 50 years and I'm still alive...so... you be the judge.

Oh, and you will love the way I slipped the extra veggies into this dish.  Devious, I am, I am!

Enjoy!

BTW- I am going to begin suggesting wine pairing notes with selected dishes, starting with this one. 

Ingredients: 

Serves 6

1 tbs. olive oil
Butter flavor cooking spray
24 slices (1/4 inch thick each) Kielbasa or turkey Kielbasa
2/3 cup coarsely chopped green bell pepper, seeded
1 slightly dried fresh cayenne pepper, seeded and cut into three pieces
¼ cup (or one small) Poblano pepper, seeded and diced*
1 banana pepper, chopped*
1 large Jalapeño pepper, seeded and chopped*
1 green Serrano pepper, seeded and chopped*

*Note:  the entire quantity of the last four peppers - minus the bell pepper and the Cayenne - should be about ½ cup chopped when combined.

2 tbs. butter
1/3 cup fresh corn
1/4 cup minced carrot
1/3 cup Vidalia or sweet onion, chopped
1 1/4 cup chopped celery
1 clove fresh garlic, minced
2 cups long grain white rice
1 beer, 12 ounces or non-alcoholic beer (something light)
1 cup organic vegetable broth
1/2 cup water plus one cup reserved
1 tsp. Creole Seasoning
1 tsp. paprika (regular)
1 tsp dried dill weed
1 tsp. seafood seasoning
1 chicken breast (5 ounces)
coarse sea salt, to taste
freshly ground cracked pepper, to taste
1 dozen medium pre-cooked shrimp, peeled and deveined
1/4 tsp. blackened red fish seasoning (optional)
1 tbs. fresh lemon juice (optional)

Directions:


Add olive oil and a generous amount of butter flavored cooking spray to a heavy Dutch oven.  Add in the Kielbasa.  Brown on both sides for about four or five minutes.  Remove from pan and set aside until ready to use.  Do not cover.   You do not want the Kielbasa to steam and continue to cook and dry out.


Add more cooking spray to the pan.  Add the bell pepper, cayenne, Poblano, banana pepper, Jalapeño and Serrano to the pan.  Cook for about three minutes until softened.


Add in the butter, the corn, onion, and celery to the pan with the peppers.  Cook for about three minutes until the butter melts.  Stir to make sure the vegetables aren’t sticking to the pan.

Remove the three pieces of Cayenne.  Dice up one of the pieces and return to pan.  Discard the other two.  (If you want this spicier, you can include all three pieces diced).


Add in the garlic, the rice, beer, vegetable broth and the 1/2 cup of the water.  Add the Creole seasoning, paprika, dill weed and seafood seasoning.  Bring to boil and reduce to simmer.  Cover and cook for 20 minutes over low heat.  DO NOT open the lid to the Dutch oven.


While the stew is cooking, sprinkle the chicken breast with salt and pepper.  Grill or pan sear until cooked through to 170 degrees.  Let rest and slice into bite sized pieces.


Sprinkle cooked shrimp with the red fish seasoning and the lemon juice.


Once the Jambalaya is cooked, remove the lid.  Add the remaining cup of water and gently stir in the Kielbasa, the cut up chicken and the shrimp.


Suggestion:   Serve with green pepper hot sauce on the side. 

Wow and double wow!

Wine Pairing Note:  Surprisingly, this dish even pairs nicely with a California (not too much oak) Chardonnay (very cold).  Suggest Rex-Goliath Giant 47 Round Rooster Chardonnay.

Wine pairing suggestion is not an endorsement.  No product supplied to blogger.